Thursday, August 13, 2009

Oh, How I Love Ceiling Medallions!

I'm totally in love with ceiling medallions. I love how classy they can make any light fixture look! I initially like clean medallions with little embellishment, but have since seen the error of my ways!

I mean look at some of these clever ideas:

Using a frame and sheets of music.
Via BHG

Using plaster to design your own.
David Prussen Via Victoria Larsen

Bling! Nuff said. Via I Lite 4 U

A sassy medallian with feathers and beads for a little girl's room!
Via Purple Cactus Studios

And I freaking LOVE this one!!! Using medallions as wall art! What an easy DIY project that I think I'll need to do if I ever get more space (i.e. bigger house!).
Via DIY Magazine

What do you think? Are you with me on this one??? Do you love ceiling medallions, too?


Tuesday, August 11, 2009

Easy Way to Dry a Bouquet

Over the years, my bridesmaid duties have taught me some funny lessons...such as how not to let your dress go up in flames while you're wearing it (learned that one the hard way - SERIOUSLY), how to give a toast that doesn't embarass the bride, how to decorate the honeymoon suite, how to make mimosas, how to create a sexy CD for the bride and groom...the list goes on.

But perhaps the most personally valuable thing I've learned (aside from the mimosas) is how to preserve and dry out a beautiful bouquet!

I was searching for a way to hang my bouquet upside down while in my closet one day and I saw an old drycleaning hanger for pants and had a thought...and that thought worked out PERFECTLY! Wanna know how I did it???


First, grab a drycleaners hanger for pants.
Carefully, without damaging the ends, pull the bar off the hanger, and bend the arms down.
Then, utilizing the "s" shape, affix it inside the stems of the flowers by hooking it into the florist's wires or the ribbon.
Hang your bouquet for about a week and you'll have a beautifully preserved bouquet to display for friends to see...and to cherish the memory of standing up as a bridesmaid with your closest friends!

So easy, but so effective! I hope this funny little tip works for you, because it sure works for me. Check out some more clever tips, by visiting Works for Me Wednesday!


Vote for Me! Purty Please!

My funny little blog was nominated for an award! Please be a doll and vote for me in the Creative Category. I guess my random recipes, DIY projects, and photography make me creative...or people just like reading Tool Talk Tuesday and PhotoFANatic Friday. Or maybe my sassiness makes me creative. Or maybe someone felt sorry for me and nominated me. ; )

Regardless, it's a huge honor that even one person out in the blogosphere reads the BLAH BLAH BLAHger's Rants and Raves, let alone 91 of you (and all you RSS subscribers)! I promise that I DO visit your blogs and that I'm having so much fun learning new things through your work, too!

Soooooo, please vote for me, when you get a chance. I'd love being among the creative bloggers in OC and hope that I get more than one vote (my own!).

tag


Tool Talk Tuesday: Sock It To Me!

Boys and Girls, today we're going to talk about yup, you guessed it, SOCKETS! They come in SO HANDY when you're trying to mount a flat screen TV on a wall...as I just found out!

Occasionally, you'll be working on a project and you'll need to ratchet in a metric fastener...in laymen's terms, that would be a six-point or even a twelve-point socket. They come in VERY helpful on heavy items and things that you've drilled directly into studs.

Even if you're not sure when you'll need them, I recommend having a starter set in your tool box. They'll be necessary at some point. And the good news is, most beginner tool sets come with them!

Visual learner, are ya? Here are some pics!

The socket attachments can be used with your drill, or a hand wrench. There are ALL sorts of price points!
When you mount heavy items, a regular screw just won't work. But a socket wrench will make your project a snap.
And then you won't have to crane your neck when watching The Millionaire Matchmaker. So glad you're back, Patti!

So, what are you all going to make sure you add to your toolbox this week??? That's right...ratchet down and SOCK IT TO ME!


Sunday, August 09, 2009

Genevieve's Wedding

Last night Genevieve and Geoff got married...and it was just beautiful! But more so, two wonderful people began their life together!

If you saw my tweet or FB status updates yesterday, you know that everything went perfectly, until one of the other bridesmaids overdid it and ended up puking...onto me. It was awful, but the bride never found out how bad things were and that's all that mattered!

The gift I gave the bride...she loved it and her hubby loved it even more!
Me doing what I do best...making mimosas! Hair - check, makeup - not so much.
The bride's amazing bouquet.
Sorry for the crappy quality of this shot, but I had to show off the beautiful bride. I can't wait to see the photographers sneak peak!!!
It's me...all gussied up. I loved the dress...I hope the drycleaner can work a miracle!
Our wine club/small group! I love these girls and am so happy we've been able to celebrate two weddings together this summer!
I spent the day with Genevieve and her family at the pool again. It was HEAVEN. It was almost sad to pack up the villa and leave. If that's how the other half lives, then I need to marry Mr. Other Half. Ha!

What a wonderful weekend, though. I hope you all had a terrific weekend, too!


Wednesday, August 05, 2009

Bridesmaid Reporting for Duty and GIVEAWAY Results!

My darling pal, Genevieve gets married tomorrow to her longtime love Geoff. I always laugh about the fact that two Gs with J sounds happened to find each other and fall in love! But they did and tomorrow the two Gs will become one. (How's THAT for cheesy? Sorry, weddings do it to me every time!!!)

If you follow me on twitter, you'll know that I've been in several weddings. I THINK this makes 14...I say think, because I ran the numbers the other night and feel like I'm missing one or two. Yes, that's a HOOPLA of weddings, but you know what? I don't mind...because every wedding I've been in has been a special part of my life. And, I love love. I love that moment when "I do" seals a person's future to another's. I love the flowers, the dress, the photography. I ESPECIALLY love a good cheesy wedding DJ. Who doesn't like the craziness of YMCA, followed by I Like Big Butts, followed by a little KC and the Sunshine Band? Ha!

Tomorrow will be a beautiful day at Pelican Hill. The wedding is all set to be gorgeous (probably the most expensive wedding I've been in...can't wait to see all the amazing details), the weather forecast is perfect, the location is insane, and the dress is just DIVINE. But even more special is being there with my pal as she gets ready to marry the love of her life!

The bride and I at her bachelorette party last month at the pool at the Standard in West Hollywood. Fun times!
Right when she arrived at the rehearsal last night, she BURST into sobs. Think a wedding is a little overwhelming??? She does!
Look at this face...think she's excited to get married? Or maybe she was just excited about the hors d'oeuvre...the tacquitos at The Cannery in Newport WERE pretty insane!!!

**********

In other news, I'm happy to announce the winner of the 18x24 poster printing giveaway sponsored by Digital Room!!! As you know, I'm a huge fan of their products and think their customer service is unbeatable.

Using random.org, lucky number seven, or Kristin from the Meringue Bake Shop as she's all known, is the winner of the print...she's excited about her upcoming 5-year anniversary and is considering enlarging a print from her wedding. Isn't that SO FITTING based upon this post???? Congrats Kristin on winning and on the anniversary!


Tuesday, August 04, 2009

Tool Talk Tuesday: Paint Brushes and Rollers with AnNicole

Tool Talk Tuesday is my way of introducing my home reno-challenged friends to ways of improving their own homes. This week, I have a special guest who never ceases to amaze me...a chick after my own heart who has been renovating her very own home. Please help me welcome her!

**********

Hi – AnNicole from Our Suburban Cottage here. I’m so glad that the Blah Blah Blahger asked me to do a guest post today.

First, I can’t tell you how much I want a miter saw and nail gun. The idea of cutting and nailing molding to my little hearts content just makes me plain giddy…but since I don’t have those tools, today I’ll be talking about my hands-down favorite tools that I do have.

My favorite house transforming tool by far is paint. Nothing, and I mean NOTHING can transform a room like paint can…and NOTHING can beat paint in terms of decorating bang for your buck….and that’s perfect for me because I’m one frugal chick. I’ve used paint to transform nearly every room in my house, and I’m not just talking about walls. Don’t be afraid to paint furniture to make an old piece look like it belongs in this century, take the plunge and paint that brick fireplace that makes your skin crawl or that faux wood 1970’s paneling that makes you cringe every time you look at it. I’ve even used paint to update outdated laminate countertops, which you can read about here and here. I've also used paint to transform ugly cabinets which you can read about here and here.

Seriously...it only took a little more than paint to transform this bathroom...
...into this.

So here are my favorite painting tools:

1) PAINT:
Um…yeah, that one’s kind of obvious, I know. I’ve heard amazing things about Benjamin Moore’s paint and I would buy it in a heartbeat if I weren’t so darn frugal. If you can afford it, I’d recommend trying it for sure. That being said, my favorite go-to brand of paint is Behr from Home Depot. It has great coverage and is very affordable at around $23 a gallon. I prefer an eggshell finish for walls and a satin finish for furniture and cabinets.

Also, I almost never use Behr colors (sorry Behr). I find my favorite colors from Sherwin Williams or Benjamin Moore and have them color matched and mixed in Behr paint. I’ve yet to have a Home Depot employee give me a hard time about this.

2) PAINT BRUSHES:
This is where I’ll splurge a little bit. You’ll never regret investing in a good brush. It won’t leave those dreaded brush strokes, and (if you wash thoroughly after each use with a mild soap…or even just water) it should last you a while.

I also like to use a 1½ to 2½ inch brush (depending on the project) with an angled tip. The angled tip makes it so much easier to get into corners…believe me.

3) ROLLERS:
Make sure you choose the right roller for your project (again…I know many of you are saying “duh”, but it is very important). If you have smooth walls, choose a roller made for smooth to semi-smooth walls. If your walls are textured, go with a roller specifically made for textured walls….I promise you’ll thank me.

And for those little projects like painting cabinets and furniture you can’t beat a small foam roller for a flawless, smooth finish.

Finally I have a few painting tips for you:

1) If you’re painting over a dark color or cabinets or furniture I HIGHLY recommend that you prime first. It will keep you from having to paint a bazillion coats of paint, and it will make the finish more durable (especially when it comes to cabinets or furniture). I prefer an oil based primer for furniture (like BIN). I also like Gripper brand primer.

2) If you’re not sure how steady your hand is at “cutting in” (or painting around the edges of walls) then go ahead and apply blue painters tape beforehand. Just make sure you put it up in a straight line and that you press down firmly enough to prevent the paint from “bleeding” underneath the tape. You can also apply a thin coat of clear polyacrylic topcoat along the edge of the tape before painting to avoid paint bleeding through the tape.

3) Dry time is very important in a good paint job. Never try to apply a second coat of paint if it’s been less than 4 hours since the first coat. And if you’re painting cabinets or furniture, use restraint and let is dry a good 12 hours between coats.

4) I like to wrap my brushes and rollers in tin foil between coats. I also cover my paint tray with tin foil so I can reuse it for the next coat.

I hope this helps some of you. Happy painting!

**********

Thanks SO MUCH to AnNicole!!! She's done some AMAZING things with paint...you MUST click through her links and check out her painted counters and renovations in her Suburban Cottage!


Monday, August 03, 2009

Your Readers Want to See Your Face!

When I'm really in the stalking groove and enjoying a blog, I'll jump around from story to story. I also almost ALWAYS read your profile and see if we have anything in common (like a diet coke addiction), if you've got self-depricating humor (my favorite), and where you live. Sometimes I read so much of a blog that I think we're friends and that I actually know you in real life (Melissa, Emily, Julia, Jasmine).

But the one thing that I CANNOT stand is when I don't know what you look like! It baffles me when writers put so much of their soul into their blog and yet don't let us see their faces. A blog (even if it's just your thoughts and words) is your way of selling yourself...isn't it better to do that in person rather than through a logo???

Which brings me to the NUMBER ONE offender...Deanna. Deanna is the DomesticChicky and the Apronista. She designs blogs, hosts two of her own, and is a photofiend (like me). We've had an online friendship and have even chatted while watching The Bachelorette (her fav, not mine) and yet I never knew what she looked like, until Saturday.

Deanna and I both decided to attend the OC Blogger's Ball and I suggested that before we go, we meet up...and then I persuaded her to let me take some profile pics. And she relented!!! I'm so glad she did, because the pics turned out so nicely and I'm hoping that homegirl decides to use them on her blogs!!!

So, now that we've taken care of Deanna...who else do we need to yell at??? Please bloggers, don't be afraid to show us your smiling face! I promise it will make people want to read you even more!!!


Thursday, July 30, 2009

Slinging Mud at My Best Friend!

My college roommie came to town last weekend and it was such a treat. I don't know about you, but old friendships are such a joy because they've seen you through tremendous growth! Emily cracks me up always, is an amazing mom to two sweet boys, and is the kind of wife I want to be someday! She's such a happy person, but more so is joyful. I want to be like her when I grow up!

I'm so thankful for Emily...for her unconditional friendship, for being a role model, for letting me stand up with her as her maid of honor when she got married. She stars in some of my funniest memories and her present-day friendship is always filled with wise advice and humorous stories about life on the other side (mommyhood).

Do you have one of those friends that is always there? That you can always rely on? I certainly hope so! I'm SO BLESSED to have a number of women in my support system and I wish the same thing for you!

We went to the Glen Ivy Hot Springs day spa for mud baths and massages. Emily's 4-year old son was VERY excited to see pictures of us playing in the mud!!!
We went wine tasting in Temecula - heaven!
We took MANY silly long arm shots like this one.
We ate well, drank well, and enjoyed spending down time by the pool, too! It was, in summary, the PERFECT weekend!

I'm sharing this post in Melissa's Beautiful Life series and hope you stop over there, too. But all in all, I hope you take the time this weekend to tell your friends how much you love and appreciate them!


POSTER PRINTING GIVEAWAY!

Hey readers, guess what?! Digital Room is hosting a GIVEAWAY for one of the BLAH BLAH BLAHger's lucky readers!!! How would you like a 18x24 high-gloss or semi-gloss poster of one of your favorite pics???

In order to enter my GIVEAWAY, simple leave a comment here telling me what image you'd like turned into a poster! For additional chances to win, you can blog about my GIVEAWAY, or tweet about it, then come back here and post another comment by Wednesday, August 5!!! Winner will be chosen on Friday, August 7, and notified immediately, so be sure to include your contact info in your post if your email address isn't linked to your blogger or WP ID!
    Disclaimers:

    Giveaway is open to US/CAN residents. Ground shipping of prizes is free, but there is a $5 handling fee that must be paid by winner. Digital Room reserves the right not to print obscene or offensive materials.

    All designs submitted in the form of a giveaway may be used by Digital Room for online marketing and promotional uses. The designs will be used solely as examples and will not be printed or commercially distributed.
As you may know, Digital Room is the number one place for poster printing!!! I'm a huge fan of their services and find them to be easy to work with, fast, and provide high quality products. If you're looking for custom poster printing and aren't the winner, please be sure to check out Digital Room as I'm confident they'll be able to meet your needs!

Incidentally, if I were chosen, I'd want to blow up this picture to poster size for my best pal. Her son's nursery is done in sports themes, which is why we did their maternity photos at a sports park with all sorts of goodies. So fun, huh?!


Let the games begin - I can't wait to hear about what YOU'LL want to print out in poster size!!!


Tuesday, July 28, 2009

Protecting Your Hair Color from Chlorine Damage

I just had my hair returned to it's, ummmm, natural state on Saturday morning. It's a delicious yummy raspberry chocolate color - can you tell I'm hungry as I write this?!

I knew I'd be doing some pool time in preparation for ANOTHER wedding, so I asked my gal how I could keep the color from being bleached out from the sun. She told me to buy a great sunscreen for hair product (by Aveda) and to avoid Chlorine.

I instantly agreed to get the sunscreen and to wear a hat while I'm laying out, but I also knew that avoiding the pool was out of the question because it's been so stinkin hot, so she gave me the most genius tip ever!

Our hair is like a sponge, she said. If you wet it FIRST with clean water from a shower, or even a hose, it won't be able to absorb the Chlorine, which is known to damage color!

Sounds silly and simple, but hey, keeping my hair from being grey is an expensive task...and I'll use any tip that prolongs the life of the color! It works for me, and I hope it works for you, too! To see other great tips, check out Works for Me Wednesday!


Tool Talk Tuesday: Living with Lindsay Teaches Us to Jigsaw!

Today, I've got Lindsay, my friend IRL (for those of you unfamiliar with Web 2.0 speak that's in real life - I'm not cool, just learned this like yesterday!), guest posting AGAIN! Because she just conquered a major project...using a JIGSAW! Impressed? I know I am...let's check out her post together!!!

*********

Puzzled over jigsaws? I was, too, until I discovered what an important job they play in DIY projects.


I recently completed a project where I needed to cut a very large shape out of MDF. Of course I couldn't do something simple like a square or a rectangle. Oh, no. I had to do something with curves and corners and swirvy lines. For some reason, I am simply unable to do something the easy way.

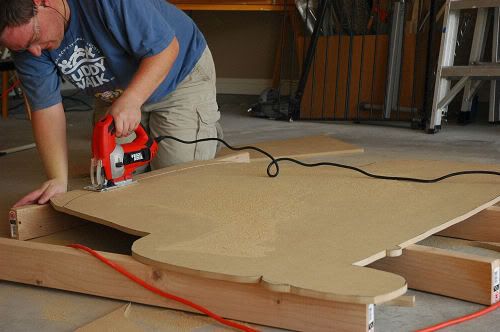
When my husband saw what I was doing, he sighed and grabbed the jigsaw. I couldn't believe how easy it was to use! I manned the camera while he did the dirty work, and we were both very happy with the results.

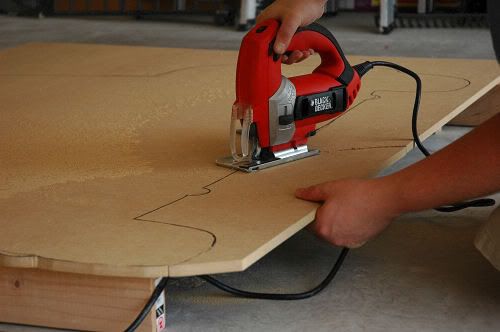
I sketched out the design on the MDF, and then we supported MDF on several pieces of 2x4, as our sawhorses were being used for another project. Tom grabbed his saftey glasses and ear protection and got to work. I was surprised to see that you basically use it the same way you would use a pair of scissors to cut a design out of the center of a sheet of paper. You start from the edge and cut in until you reach the line drawing. Then, you just cut along the line.

As he was cutting, Tom gave me a few pointers so I could cut something without bugging him by myself the next time I needed to use the jigsaw:

    1. Vibration is the enemy. You need to have both ends of the work supported and held down.

    2. Do not lift the saw out of the cut while the blade is moving. (The blade will sometimes grab and then slam back down into the work, which can bend the blade and scar the work)

    3. Pick the right blade. The packages are labelled, and the tooth spacing for smooth wood cuts is surprisingly course.

    4. You can make fairly tight turns with a jigsaw, but anything tighter than about the diameter of a quarter is asking for trouble. Make those cuts in two passes.

    5. On many surfaces, the sole of the saw (the metal plate it slides on) will leave marks, especially on painted surfaces. If I have doubts, I cover the sole with blue painter's tape.

    6. Keeping the saw held flat and firm against the work will give you much better results.

Now, you're dying to know what I was making, huh? Well, I'll fill you in....tomorrow! Head on over to my blog, Living With Lindsay, for the full run down and the big reveal. I hope not knowing doesn't "drive" you crazy until then!

Have you used a jigsaw before? Do you have any tips or tricks to share? Are you still scared to use one? Let us know!

**********

Thanks, Linds for sharing your adventures with jigsaws!!! I've seen the finished product and I think you all will join me in showering her with accolades, which she really really loves!!! ; )


Monday, July 27, 2009

If You Could Change the Style of Your House, Would Ya?

Yesterday, my pal Jennifer came over and she commented that she hadn't been to my house in almost 2 years because I always came up to hers...I didn't want to believe it was true, but she hadn't seen ANY of the changes I've made since '07. I was bamboozled. But she gave me her seal of approval, which doesn't come very easily because she's got an artist's eye and great design sense. Even though she and I are at opposite ends of the design spectrum, I've always admired her commitment to her mid-century modern flair. She buys each piece in her home through painstaking research and has acquired some BEAUTIFUL antiques.

Now, I'm a traditional home girl, or at best stretch it out to transitional (channeling my home girl Candice Olsen), but part of me has always wanted to rock out a retro eat in kitchen and kitsch it up! But sadly, my current home has an open floor plan and I just couldn't commit to that kind of theme... Having said that, there was a time when I collected the cat wall clock whose eyes tic tock back and forth and funny tintype wall hangings because at the end of the day...they just make me laugh! If I still have those pieces, they're boxed up in never neverland (aka, my garage, which YES, I'm still working on!).

While I still love the style I've embraced, I certainly still admire a well designed home. For instance, even though I'd NEVER go modern, I absolutely enjoy the architectual details and how the lines all speak to each other. Take this living room example from West Elm:

The sharp lines of the sofa are broken up by the buttons, which in turn, speak to the ovaled rug, throw pillows, and starburst wall mirrors. It's sparce, but from the picture, I can imagine this setting in the home of either a really fun and funky young couple in a loft-style home in a city, or in the home of a broody, yet HOT, geek-chic lawyer who really knows how to rock out his glasses.

PLEASE PARDON THE INTERUPTION AS A I FAN MYSELF...GEEK-CHIC APPARENTLY MAKES ME SWOON!

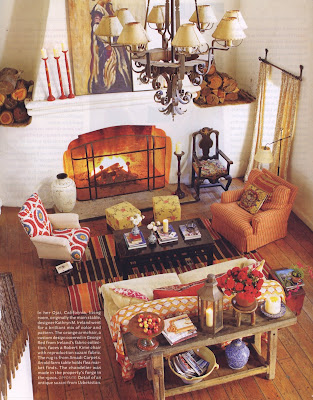
A couple of my best friend's have a beautiful home, filled with hacienda-style accents, which SHOCKER, is not all that uncommon in southern CA. Many of the accents are rustic, coupled with gorgeous iron work. They've done their home beautifully, but it's not my asthetic. Having said that, this style is known for incorporating bright bold colors that span the rainbow! I love a good punch of color, and Clare and Matt's living room makes me think of sunset! The clip below from House Beautiful, explains the use of color perfectly...isn't all that color to die for?!?!

I'm also not a nautical person...but again, a well done room can make me drool. I just stumbled across Simone's blog, Beach Vintage, and fell in love with the whimsy she's got going on in her home. She FRAMED three adorable vintage swimsuits. Dont' you just love that idea??? She also has whitewashed chairs at her table, which really embraces the whole beach/nautical theme.

I could go on and on about the styles that I don't care for, but still can appreciate in other's homes. My parents have a gorgeous home but it's very country and flowery and I always knew that I'd never want to see another flower again...but I still think their house is beautiful.

Do YOU have a style that you'd NEVER use, but still find attractive? OR, if you could wipe the slate clean, would you redo your home in a totally different way? I'd love to know! Leave me a comment and let me know your thoughts!!!



Wednesday, July 22, 2009

And The Great Garage Organization Project Begins...

In an attempt to get my garage organized and no longer looking like a Third World Country, I've made my first purchases...hopefully, getting things off the ground and on the wall will bring a cohesiveness to the storage area that was lacking until now.


Hey, it could be worse...my garage could look like my FEMALE neighbor's with the tacky posters of bikini-clad women!


Tuesday, July 21, 2009

Tool Talk Tuesday with Mrs. Limestone and Her Electric Staple Gun!

Not long ago, I stumbled upon a new favorite...Mrs. Limestone of "A Brooklyn Limestone In Progress." She's living my ultimate dream and renovating a home with her hubby! In every project and design photo I've seen on her blog, I can see her magnificent taste and flair. Each and every piece in her home is chosen perfectly and nothing was left to happenstance. If you haven't been over to her blog, read her guest post below, then go to her blog IMMEDIATELY!!!

********

Thanks so much to JJ for asking me guest post for Tool Talk Tuesday. While I do own a toolbelt (with my name on it no less!), I don't have loads of power tools filling my basement. I suppose I'm a woman of few gadgets. So rest assured I'm not shilling out just any old thing. This is the real deal.

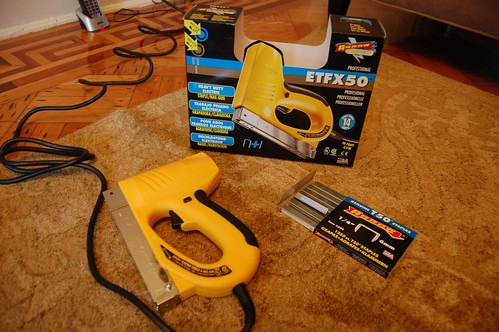
Let me introduce you to my little friend....the electric staple gun.
My new toy - electric staple gun
Please note the telephone in the upper part of the photo. I kept it in reach in case I stapled my eye shut or some other such clumsy person accident.

If you have ever used a manual staple gun, you'll know they are just fine for one or two staples but much more results in a handful of blisters. No more! This thing can staple anything as many times as your heart desires at the pull of a trigger. And yes, its a hair trigger. Be careful ladies!

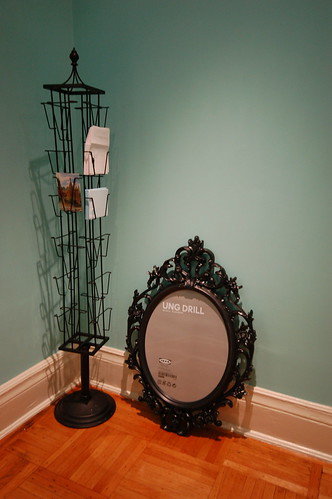
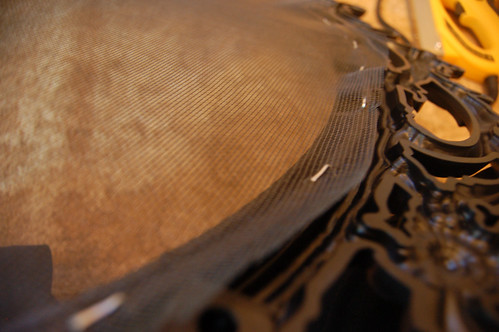
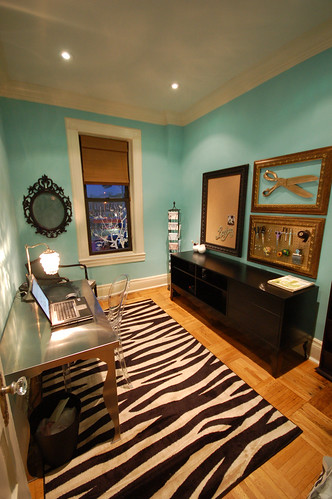
I admit I haven't done any wow worthy projects with it but it just makes a simple job so much simpler, its well worth the money. Case in point, I wanted to turn this large picture frame into a jewelry holder.
Office Accessories

Staple, staple, staple some cut screening....
And it was done and hung.

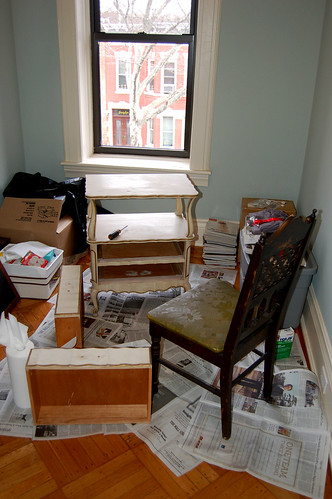
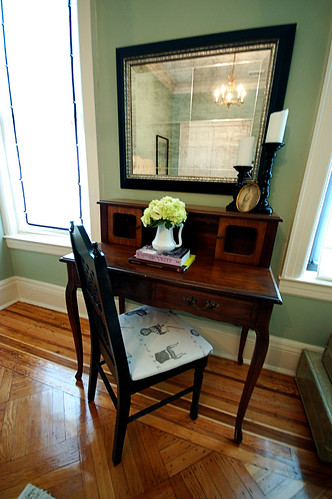
Or reupholstering the seat of an old chair.
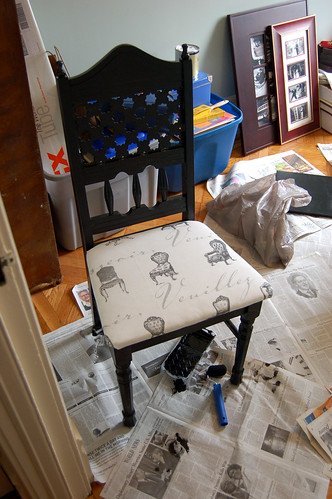
A coat of paint, fresh fabric and an electric staple gun to the rescue.
And put into place.

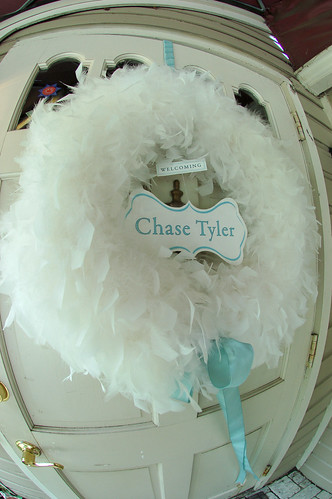
It also comes in handy for party decorating! I used it to staple feather boas on a wooden ring to make this wreath
Wreath on Front door

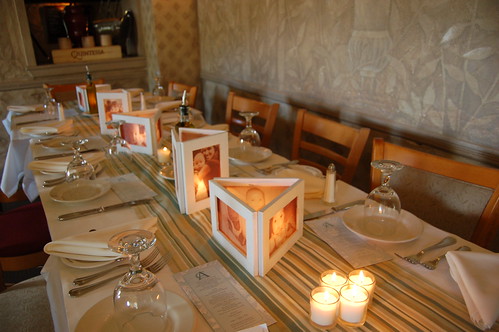
And to staple photos printed on vellum to make these photo centerpieces
Photo Centerpieces

Have I convinced you that you need one? Happy Stapling!


********
So, I'm not ashamed to admit that I'm completely jealous of her electric staple gun, as opposed to my manual one...or the fact that she has a tool belt on it with her name. I mean, I NEED one, don't you?!

Thanks again, SO MUCH, Mrs. Limestone for stopping by and visiting us today. Your projects are gorgeous and I just LOVE what you're doing with your home. The new coffee table is perfect and I can't wait to see more of what you're doing out there in NY!!!