.png)
Today, I've got Lindsay, my friend IRL (for those of you unfamiliar with Web 2.0 speak that's in real life - I'm not cool, just learned this like yesterday!), guest posting AGAIN! Because she just conquered a major project...using a JIGSAW! Impressed? I know I am...let's check out her post together!!!
*********
Puzzled over jigsaws? I was, too, until I discovered what an important job they play in DIY projects.
I recently completed a project where I needed to cut a very large shape out of MDF. Of course I couldn't do something simple like a square or a rectangle. Oh, no. I had to do something with curves and corners and swirvy lines. For some reason, I am simply unable to do something the easy way.
When my husband saw what I was doing, he sighed and grabbed the jigsaw. I couldn't believe how easy it was to use! I manned the camera while he did the dirty work, and we were both very happy with the results.
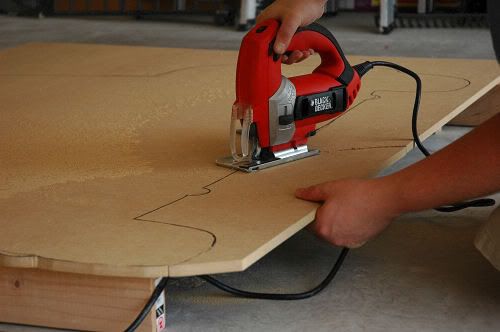
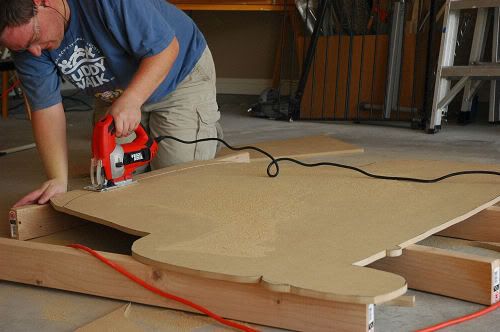
I sketched out the design on the MDF, and then we supported MDF on several pieces of 2x4, as our sawhorses were being used for another project. Tom grabbed his saftey glasses and ear protection and got to work. I was surprised to see that you basically use it the same way you would use a pair of scissors to cut a design out of the center of a sheet of paper. You start from the edge and cut in until you reach the line drawing. Then, you just cut along the line.
without bugging him by myself the next time I needed to use the jigsaw:

I recently completed a project where I needed to cut a very large shape out of MDF. Of course I couldn't do something simple like a square or a rectangle. Oh, no. I had to do something with curves and corners and swirvy lines. For some reason, I am simply unable to do something the easy way.
When my husband saw what I was doing, he sighed and grabbed the jigsaw. I couldn't believe how easy it was to use! I manned the camera while he did the dirty work, and we were both very happy with the results.
I sketched out the design on the MDF, and then we supported MDF on several pieces of 2x4, as our sawhorses were being used for another project. Tom grabbed his saftey glasses and ear protection and got to work. I was surprised to see that you basically use it the same way you would use a pair of scissors to cut a design out of the center of a sheet of paper. You start from the edge and cut in until you reach the line drawing. Then, you just cut along the line.
- 1. Vibration is the enemy. You need to have both ends of the work supported and held down.
2. Do not lift the saw out of the cut while the blade is moving. (The blade will sometimes grab and then slam back down into the work, which can bend the blade and scar the work)
3. Pick the right blade. The packages are labelled, and the tooth spacing for smooth wood cuts is surprisingly course.
4. You can make fairly tight turns with a jigsaw, but anything tighter than about the diameter of a quarter is asking for trouble. Make those cuts in two passes.
5. On many surfaces, the sole of the saw (the metal plate it slides on) will leave marks, especially on painted surfaces. If I have doubts, I cover the sole with blue painter's tape.
6. Keeping the saw held flat and firm against the work will give you much better results.
Now, you're dying to know what I was making, huh? Well, I'll fill you in....tomorrow! Head on over to my blog, Living With Lindsay, for the full run down and the big reveal. I hope not knowing doesn't "drive" you crazy until then!
Have you used a jigsaw before? Do you have any tips or tricks to share? Are you still scared to use one? Let us know!
**********
Thanks, Linds for sharing your adventures with jigsaws!!! I've seen the finished product and I think you all will join me in showering her with accolades, which she really really loves!!! ; )


3 comments:
I can't wait to see what the project is!
Well, darn it! I want to know what it is right now. :) Thanks for tips, Lindsay...glad you were featured here today! :)
Thanks for the tips on jigsawing. I'm in love with my borrowed one now.
Post a Comment